4. Application with Deep Learning
4.1. Machine Configuration
Deep learning is a field with intense computational requirements mainly when you deal with image processing.
For this project we proposed a structure to integrate GEE (Google Earth Engine) and Tensorflow.
Minimal Requirements
Google Cloud AccountCreate an computer engine instance:1 core3.5gb RAM60gb of Storage (hdd or ssd)Ubuntu 16.041 GPU Nvidia K80Installation of the libraries
This material is based on Using a GPU & TensorFlow on Google Cloud Platform
- Install python and jupyter
# system update
apt-get -y update

# python pip installation
apt install -y python-pip

# config to notebook
apt-get -y install ipython

apt-get -y install ipython-notebook

# jupyter installation
pip install jupyter

apt-get -y install python3-pip

python3 -m pip install ipykernel

# python kernel to jupyter notebook
python3 -m ipykernel install --user

# only python 3
cd /notebooks && jupyter notebook --allow-root --ip='*'
Driver installation
In this point it is required to install nvidia driver and gpu driver.
To install the gpu driver it can be used this code
#!/bin/bash
echo "Checking for CUDA and installing."
# Check for CUDA and try to install.
if ! dpkg-query -W cuda; then
    # The 16.04 installer works with 16.10.
    curl -O http://developer.download.nvidia.com/compute/cuda/repos/ubuntu1604/x86_64/cuda-repo-ubuntu1604_9.0.176-1_amd64.deb
    dpkg -i ./cuda-repo-ubuntu1604_9.0.176-1_amd64.deb
    apt-get update
    # apt-get install cuda -y
    sudo apt-get install cuda-9-0
fi
Installing cuDNN
In this point it is needed to be logged in nvidia website and download cudnn-download and send to the server by scp copy file.
To install:
cd $HOME
tar xzvf cudnn-9.0-linux-x64-v5.1.tgz
sudo cp cuda/lib64/* /usr/local/cuda/lib64/
sudo cp cuda/include/cudnn.h /usr/local/cuda/include/
rm -rf ~/cuda
rm cudnn-9.0-linux-x64-v5.1.tgz
Test
Install library on system
# must use tensorflow 1.9
pip install --upgrade tensorflow-gpu==1.9.0

nvidia-smi -l
Run code
# tensorflow library
import tensorflow as tf
sess = tf.Session(config=tf.ConfigProto(log_device_placement=True))
4.2. dl-semantic-segmentation
The project of this tutorial can be found in this link.
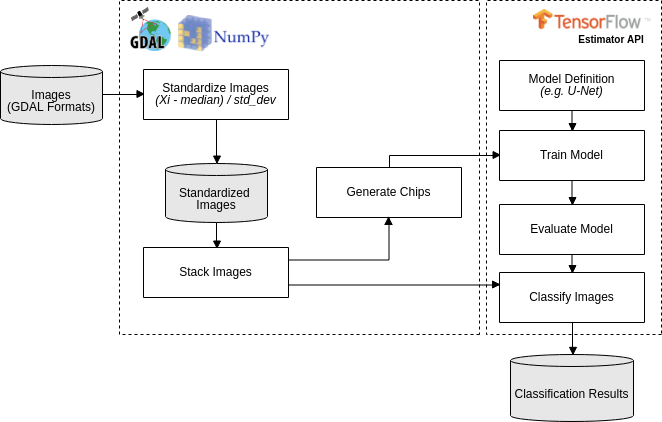
Deep-learning applied to semantic segmentation of remote sensing data, according to this workflow:
4.3. Workflow Execution (Forest toy data)
Download the Forest toy data in this link and follow the instructions below:
- Standardize the two images, the one will be used to train the model e another one that will be classified:
./standardize_imgs.py -n 0 -b 1 2 3 4 -i forest_toy/raw_data/mosaic_201709.tif forest_toy/raw_data/mosaic_201801.tif -o forest_toy/stand_data
- Stack the standardized image and the forest map (e.i. the reference data):
./stack_imgs.py -i forest_toy/stand_data/mosaic_201709_stand.tif -r forest_toy/raw_data/forest_201709.tif -o forest_toy/stand_data/forest_201709_model_input.vrt
- Generate the chips (i.e. a set of pixels with regular squared size) without data augmentation (see Usages):
./generate_chips.py forest_toy/stand_data/forest_201709_model_input.vrt -o forest_toy/chips
- Train a U-net model, for 20 epochs, using default hyperparameter (see Usages):
./train_model.py -e 20 -i forest_toy/chips -o forest_toy/model/
- Follow the trainning process using tensorboard:
tensorboard --logdir=forest_toy/model/
- Evaluate the trained model:
./evaluate_model.py -m forest_toy/model
- Classify the other image:
./classify_imgs.py -m forest_toy/model -i forest_toy/raw_data/mosaic_201801.tif -o forest_toy/result
- Check the classification result, forest_toy/result/mosaic_201801_pred.tif, in QGIS:
./classify_imgs.py -m forest_toy/model -i forest_toy/raw_data/mosaic_201801.tif -o forest_toy/result
4.4. Usages
standardize_imgs.py
usage: standardize_imgs.py [-h] -i IMAGES [IMAGES ...] -b BANDS [BANDS ...] -n
                       IN_NODATA [-d OUT_NODATA] [-t CONVERT_INT16] -o
                       OUTPUT_DIR [-c CHUNK_SIZE]

STEP 01/06 - Standardize multiple images using the formula: (value - median) /
std_dev. The median and std_dev will be calculate by band (e.g. blue, red)
considering all images.

optional arguments:
    -h, --help            show this help message and exit
    -i IMAGES [IMAGES ...], --images IMAGES [IMAGES ...]
                            <Required> List of input images.
    -b BANDS [BANDS ...], --bands BANDS [BANDS ...]
                            <Required> The image bands that will be standardized.
    -n IN_NODATA, --in-nodata IN_NODATA
                            <Required> Nodata value of input images.
    -d OUT_NODATA, --out-nodata OUT_NODATA
                            Nodata value of standardized images. It will be
                            ignores when convert-int16=True. [DEFAULT=-50]
    -t CONVERT_INT16, --convert-int16 CONVERT_INT16
                            Convert the standardized images to int16, multiply its
                            pixel values by scale factor 10000. It will reduce the
                            size of the output files and use -32767 as nodata
                            value. [DEFAULT=False]
    -o OUTPUT_DIR, --output-dir OUTPUT_DIR
                            <Required> Output directory that will have the
                            standardized images.
    -c CHUNK_SIZE, --chunk-size CHUNK_SIZE
                            The amount of data that will be processed, per time,
                            by standardization process. In case of memory error
                            you should decrease this argument. [DEFAULT=1000]
stack_imgs.py
usage: stack_imgs.py [-h] -i IMAGES [IMAGES ...] [-b BANDS [BANDS ...]]
                 [-r REFERENCE] -o OUTPUT

STEP 02/06 - Stack multiple images into a sigle Virtual Dataset-VRT image. If
informed, the reference image will the last band.

optional arguments:
    -h, --help            show this help message and exit
    -i IMAGES [IMAGES ...], --images IMAGES [IMAGES ...]
                            <Required> List of input images.
    -b BANDS [BANDS ...], --bands BANDS [BANDS ...]
                            The bands that should be stacked. [DEFAULT=All]
    -r REFERENCE, --reference REFERENCE
                            <Required> Image with reference data, that should have
                            only these pixel values: 0=without information,
                            1=object of interest, 2=not an object of interest.
    -o OUTPUT, --output OUTPUT
                            <Required> The name of VRT output image
generate_chips.py
usage: generate_chips.py [-h] -i IMAGE -o OUTPUT_DIR [-n NODATA]
                     [-s CHIP_SIZE] [-p PAD_SIZE] [-f OFFSET [OFFSET ...]]
                     [-r ROTATE] [-l FLIP] [-d DISCARD_NODATA]

STEP 03/06 - Generate a several chips (i.e. a set of pixels with regular
squared size) considerering the input image. The last band will be used as
expected output result, and should have only these pixel values: 0=without
information, 1=object of interest, 2=not an object of interest. If a chip has
only pixel values equal to 0, into reference band, the chip will discarded.

optional arguments:
    -h, --help            show this help message and exit
    -i IMAGE, --image IMAGE
                            <Required> Input image that will be used by chip
                            generation process.
    -o OUTPUT_DIR, --output-dir OUTPUT_DIR
                            <Required> The output directory that will have the
                            generated chips.
    -n NODATA, --nodata NODATA
                            Nodata value of input image. [DEFAULT=-50]
    -s CHIP_SIZE, --chip-size CHIP_SIZE
                            Size of the chip with output result. A chip always
                            will be a square. [DEFAULT=100]
    -p PAD_SIZE, --pad-size PAD_SIZE
                            Padding size that will establish the size of input
                            chip, with spectral data. A padding size of 93px and a
                            chip size of 100px will result in a input chip of
                            286px. [DEFAULT=93]
    -f OFFSET [OFFSET ...], --offset OFFSET [OFFSET ...]
                            As a data augmentation option, offset argument will be
                            used to produce chips with a percentage of overlap. An
                            offset 0,50 will generate chips with 50 percent of
                            overlap in the axis y. [DEFAULT=0,0]
    -r ROTATE, --rotate ROTATE
                            As a data augmentation option, rotate argument will
                            rotate all the chips at angles 90, 180 and 270
                            degrees. [DEFAULT=True]
    -l FLIP, --flip FLIP  As a data augmentation option, flip argument will
                            flip, in the left/right direction, all the chips.
                            [DEFAULT=True]
    -d DISCARD_NODATA, --discard-nodata DISCARD_NODATA
                            Chips with nodata values will be discard by chip
                            generation process. You shouldn not considerer put true
                            here. [DEFAULT=True]
evaluate_model.py
usage: evaluate_model.py [-h] -m MODEL_DIR

STEP 05/06 - Evaluate a trained model.

optional arguments:
    -h, --help            show this help message and exit
    -m MODEL_DIR, --model-dir MODEL_DIR
                            <Required> Input directory with the trained model and
                            the tensorboard logs.
classify_imgs.py
usage: classify_imgs.py [-h] -i IMAGES [IMAGES ...] -m MODEL_DIR -o OUTPUT_DIR
                    [-p MEMORY_PERCENTAGE]

STEP 06/06 - Classify a list of images using a trained model.

optional arguments:
    -h, --help            show this help message and exit
    -i IMAGES [IMAGES ...], --images IMAGES [IMAGES ...]
                            <Required> List of input images that will be
                            classified.
    -m MODEL_DIR, --model-dir MODEL_DIR
                            <Required> Input directory with the trained model and
                            the tensorboard logs.
    -o OUTPUT_DIR, --output-dir OUTPUT_DIR
                            <Required> The output directory that will that will
                            have the classification output.
    -p MEMORY_PERCENTAGE, --memory-percentage MEMORY_PERCENTAGE
                            Reading the input image until memory percentage reach
                            the value defined by this argument. After that, the
                            classification will execute for readed data.
                            [DEFAULT=40.0]